Final / Improved and Developed edits:


The following four edits are all part of my final outcome and development of this project as I feel I have improved in editing and have produced of edits of a better standard. As stated in my statement of intent, I wanted to improved my editing skills and take further photo shoots in order to fulfill this aim, which I have specifically achieved for this photographer.

|
Annotation of edit:
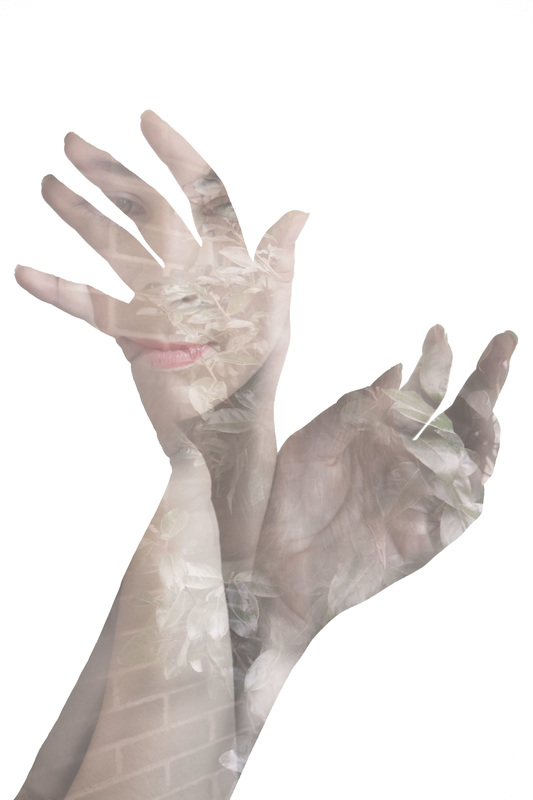
In this edit, I was particularly inspired by two pieces produced by Dan Mountford called The Butterfly Lion as well as Hideaway hands. The Butterfly Lion consists of two subjects blending into one to create a detailed piece, however I was also inspired by Hideaway hands which is the reason for photographing hands. My intentions where to blend the two styles together to produce a different style. I feel that the composition was effective in ways as you could still identify the separate images whilst in one frame. I think that there is a touch of elegance within this photo due to the position of the models hand and how they flow together. In Photoshop, I blended the two images together subtly also making adjustments such as tweaking the brightness, contrast, saturation and also the lightness. The colours are quite similar which is what I think has a big impact on how well they blend together the way that they do, however the twist in the photograph is the pop of colour on the profile of the model. She wears red lipstick to draw the readers attention to her expression and ask, "What is she thinking?". When in Photoshop, after first blending the two images together it seemed very two dimensional. When comparing it to Mountfords work, i need to rethink my editing process, resulting in adding more depth and tone into the piece and yet still small details of the hands which i think was effective. If I were to refine this image, I would experiment in cooperating two different images together and exploring composition to produce a further outcome however still in the style of the photographer. |

|
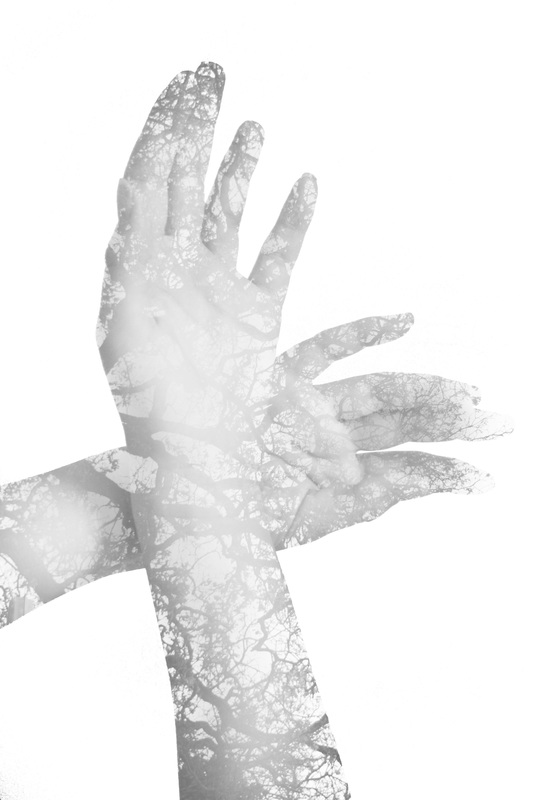
Annotation of edit: As I am inspired by Dan Mountford's work, my aim was to create an edit with a similar effect. This effect was that it was a double exposure and I have shown below the steps for how I edited this edit on Photoshop. Both of the images combined on the edit were taken on a Nikon D3300 as it could capture good quality images. This main subject is of the hands however layered over this is an image of a large tree's branches. This photo was effective as in Photo-shop, I softened the edit to allow noticeable dimension to each finger and also the arms. The adjustments I made in Photoshop were the brightness of the overall image, also decreasing the saturation down to put a black and white effect on my edit similar to most of Dan Mountford's edits and also the lightness was increase for a simple effect |

|
Annotation of edit: Compared to previous edits which have been inspired by Dan Mountfords edits with subject matters of hands, I was inspired by another piece with a similar style for my edit. In this edit, I aimed to include various colour tones to add my own personal touch into the investigation. To take both images in the image i used a DSLR Nikon D3300 with a standard lens to capture a good quality photo. Mountford's work inspired me in this piece as he has large amounts double exposure edits which is what i was trying to recreate in this image. I feel that in this edit the composition is effective as the profile of the model is creates a dramatic message as she looks downward. The viewer may question the thoughts going through the subjects mind. In Photoshops the main adjustments made to produce this final edit was increasing the the brightness, decreasing saturation levels slightly, increasing contrast and also lightness. I purposely dulled the colour of the bricks which were more vibrant and held more colour however, I thought the change in reddish tone would be effective. This then blends in well with the rest of the piece however still draws the viewers eyes to the edit. If I were to refine this image further than i have, I would experiment with different texture backdrops to then contrast with vibrant touches of colour. |
|
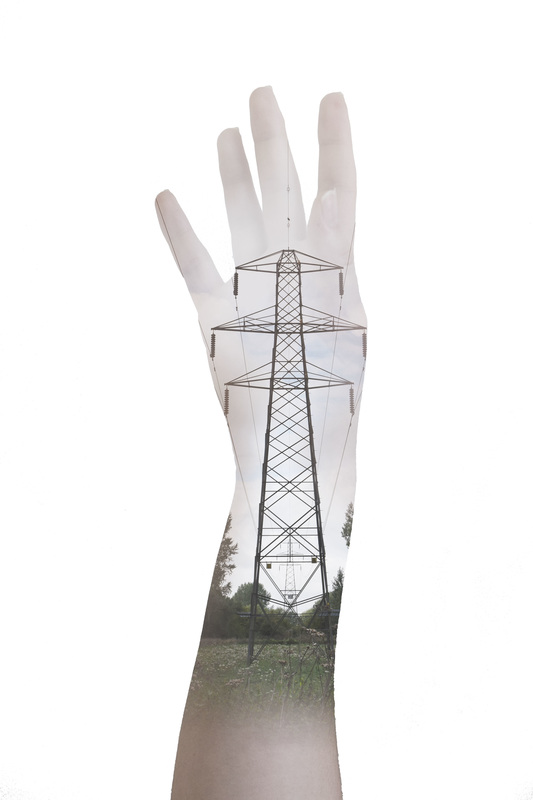
Annotation of edit: When in the process of completing this edit I was attempting to take advantage of the vertical position of the arm and cooperate an image I had previously taken in my initial photo shoot. I thought this to be effective as the main subject of the Pylon is very large compared to the size of the hand and was able to blend well with the shape of the hand. Both images were taken with a DSLR in order to edit with high quality images. Some of Mountford's work consists of hand gestures which is what i wanted to incorporate within this edit. In Photoshop, I adjusted saturation levels, brightness and lightness levels to lightly blend the colours together so that overall the whole image is combined well. I liked how you are able to see minor details of the models hand and small aspects and details to bring depth into the edit. The colours co-ordinate well together as they are very neutral colours with a hint of the models natural skin colour to add to the nature in the main subject.In order to refine this image, I would photograph similar vertical aspects of other locations to incorporate within this piece, experimenting with other colours also. |
Initial edits:


|
Annotation of edit:
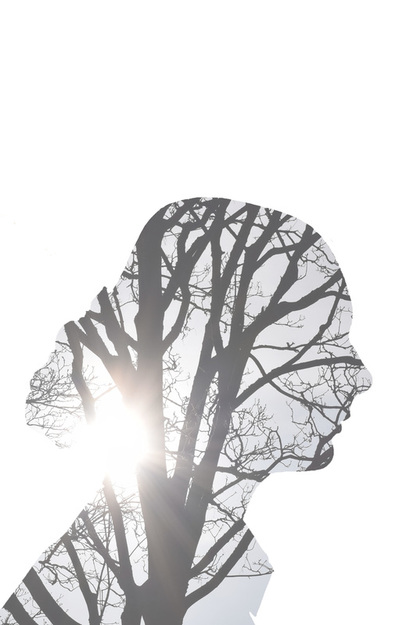
Within this edit, my aim was to use double exposure to produce a Dan Mountford styled edit. I produced this through Photoshop (shown by the steps below) and captured both the images on a DSLR Camera to ensure that it was of good quality. I took both of these images on separate days as on was with artificial lighting and the other natural. The work of Dan Mountford influenced my work as I also used the double exposure technique throughout the theme. The composition is effective because it has the outline of a humans face structure but the detailing inside is of a different objective which makes it effective. By having the image inside of the outline of another photo it forms a silhouette. I purposely made the background of this image white and placed it in the center so the focal point would be on the objective and not the background. The colours in the photo are light and soft, blending together well. The tones are light so it is not harsh on the eyes but you can still notice the separation between the objective and background. As the colours are all light, it sets a peaceful and calm mood for the viewer. In order to refine this image and proceed to develop it further, I would choose different areas of the image inside and experiment further at different positions. |
|
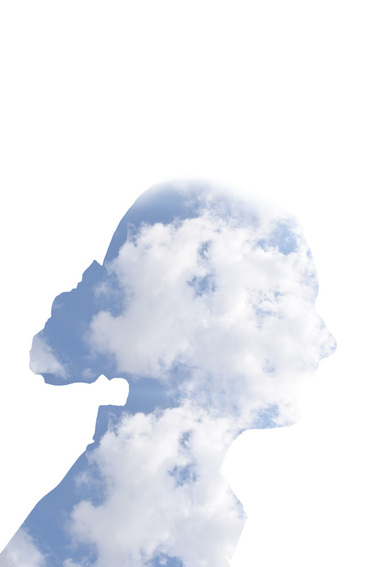
Annotation of edit:
For this edit, my aim was to blend together clouds which are usually associated with simple and carefree thoughts within my image to send a peaceful message across. Mountford has a large variety of different subject matters so i expanded more and decided to capture images of blue skies and clouds. In Photoshop, I copied the two images of clouds and blended them to form a whole image using the eraser tool, also adjusting the brightness, lightness and saturation. I also faded out the top of the models head to create a subtle blend from the main subject focus into the background, as the clouds and subject share a white colour scheme. The composition was effective in ways as the clouds filled the entire portrait. The image showed depth into the clouds and minor details to add more effect to the image. If I were to refine this edit further, I would take pictures at different times of the day such as sunrise, sunsets and starry skies at night also I would re shoot profiles of my model to include various angles. |
|
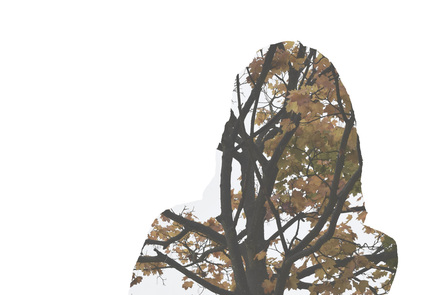
Annotation of edit:
For this edit, I wanted to combine a natural effect into this edit as many of Mountfords edit's consist of vegetation such as trees in different seasons. This edit was not the most effective edit as i think the colours have not been portrayed at a high standard and the colours do not cooperate together well. I used a DSLR for both pictures however I had used a portrait image from a previous photo shoot which if I were to improve this edit, using a different portrait would be one of the first steps to making the edit better. |

|
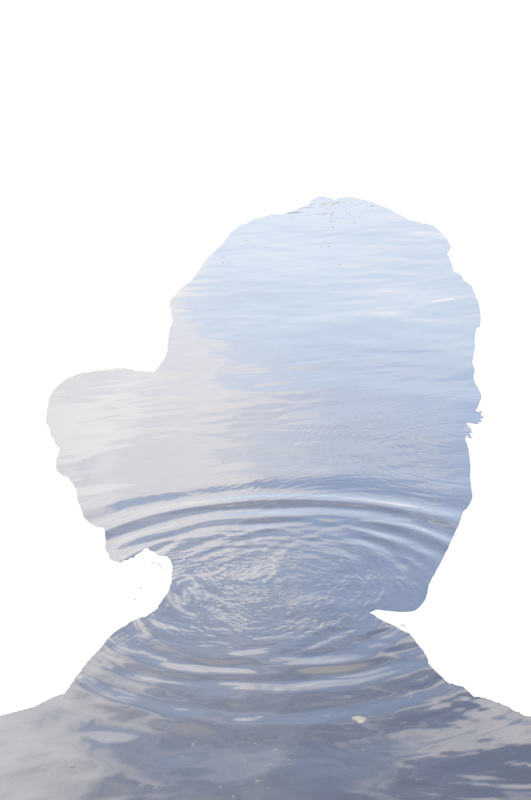
Annotation of edit:
For this edit I incorporated an image I captured from my initial photo shoot as I wanted to produce a double exposure effect by combing the two. I took both images on a DSLR, Nikon D3300 which is of high quality to ensure a clear photo when it came to editing. The subject mater of the ripples give a calming message of a quiet and subtle environment. Mountford's work has influenced my own at a high level as I wanted to mainly focus on double exposure images. The main tones and colours are blue as grey which I though blended together well as the grey effect on the water represented the light from the sun reflecting onto the surface of the water. The adjustments I made in Photoshop consisted of brightness levels and lightness as it made the image appear clearer and crisp. I also added in a white background to make the image seem sharper. To further develop my edit I want to use different angles of the model and possibly add a reflection into the water to create a different subject matter. |
